An easy way to ensure you don’t overspend or overshop is to make a list of required items beforehand. This can also help you track your current shopping. And with the latest iOS 17 update, you can create and even share a Shopping List on your iPhone.
While you can create lists using iOS 16 or lower, you can’t select a separate Shopping category. Additionally, you will have to create subtasks and categories, if available, manually. However, if your device runs iOS 17, you can do that and more using the Reminders app. So, let us look at how you can create and share a Shopping List on your iPhone.
Note: Ensure your iPhone is running iOS 17 or higher before proceeding.
How to Enable Reminders App on iPhone Before we create a Shopping List (formerly Grocery List) on your iPhone, you must ensure that you have enabled the Reminders app in iCloud’s settings menu. If not, you can’t access this feature on your iPhone. Here’s how to do it.
Step 1: Open the Settings app.
Step 2: Here, tap on your profile name.
Step 3: Tap on iCloud.
Step 4: Go to the ‘Apps Using iCloud’ section and tap on Show All.
Step 5: Scroll down and turn on the toggle for Reminders if not already.
This will ensure you can make a Shopping List on your iPhone. To know more, continue to the next section.
Once created, you can add the required items to the list. And with the auto-sorting features, the Reminders app will automatically sort these items into different categories. So, let us look at how to create a Shopping List on your iPhone without any third-party apps.
Step 1: Open the Reminders app on your iPhone.
Step 2: Then, tap on Add List.
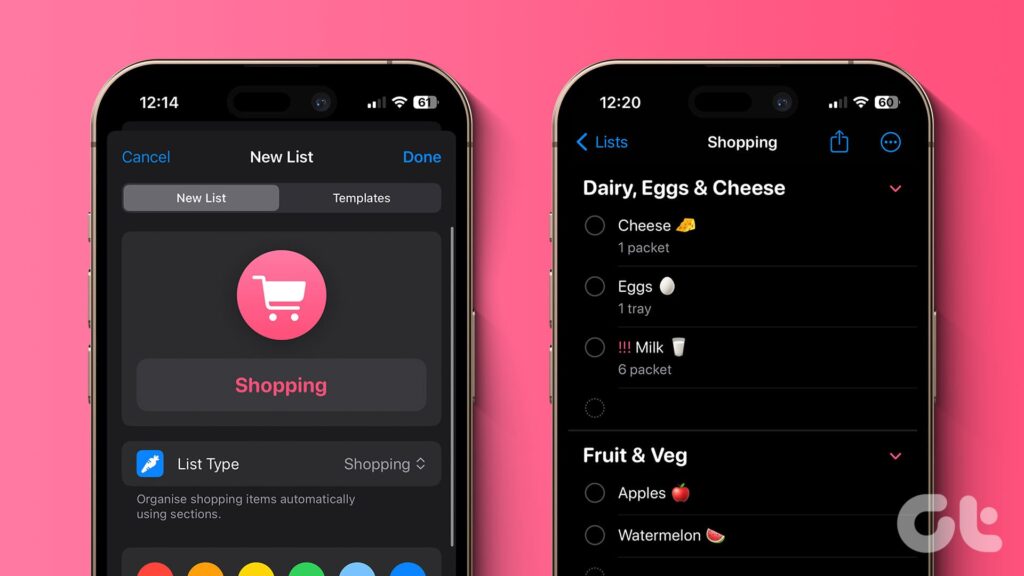
Step 3: First, add a name to your list. Then, tap on the List Type option.
Step 4: Select Shopping.
Step 5: Then, select the appropriate symbol and color for your Shopping List icon, if required.
Step 6: After you add all the details, tap on Done.
Step 7: Once the newly created Shopping List opens, tap on New Item.
Step 8: Here, type the name of the item. Then, tap on the i icon beside it.
Step 9: Use the categories to add additional information regarding the item. Then, tap on Done.
Step 10: Repeat this process to add other items. They will automatically sort into different categories.
Note: Apple will list the Unrecognized items under the Other category.
Step 11: Tap the empty space beneath the last category’s line to add an item to a new category.
Step 12: Then, proceed to add the item and customize it as you want.
This will ensure a new category is created for the item. Or, if a relevant category already exists, your item will be automatically moved to it in the Reminders app on your iPhone. You can now use this list as you like.
The beauty of a shopping list is the ability to include or exclude items as per your requirements. This helps ensure any forgotten items make the list and those no longer required are excluded from it. So, here’s how you can edit any pre-existing Shopping List in the Reminders app on your iPhone.
Step 1: Open the Reminders app and tap on the relevant Shopping List.
Step 2: If you feel like the list is too cluttered, you can delete the items. To do that, hold and swipe left on the item.
Step 3: Here, tap on Delete. Repeat the process for any other items.
Step 4: For items you’ve already purchased, you can mark them as done. To do that, tap on the dot in front of the item.
Repeat this process for other items.
Step 5: Tap on the three-dot icon to edit the list view.
Step 6: Here, use the options to change the list view, save the list as a template, print it, complete it, etc., using the available options.
Step 7: Or, if you wish to edit the main list information, tap on ‘Show List Info’.
Step 8: Here, make the necessary changes.
Note: Ensure the List Type stays as Shopping.
Step 9: Once all the changes have been made, tap on Done.
This will help you change the Shopping List color, name, and icon to make it stand out from any other list present in the Reminders app.
Edit Item Priority or Category Step 1: Go to the relevant Shopping List and tap on the item whose information you wish to edit.
Step 2: Once visible, tap on the i icon in front of it.
Step 3: Here, change the priority for the item by tapping on the Priority option.
Step 4: Tap on the relevant priority option for the selected item.
Note: Depending on the priority, !, !! or, !!! sign will be added in front of the item in the list.
Additionally, you can also make changes to the item category. This can be helpful if the item has been automatically sorted into the Other category.
Step 5: To do this, tap on the Section option.
Step 6: Scroll through this page and select the relevant option.
Note: If the selected category is already available in your shopping list, the item will be moved there. Or else it will create a new category.
Step 7: Once you make all the relevant changes, tap on Done.
Step 8: You can also change the category from the list itself. If the option is available, tap the suggested category under the added item.
This will ensure that you move the item to the right category and assign the correct priority within your Shopping List. It not only helps structure the Shopping List but also prioritizes the selected items.
If you’re out shopping with your friends and family, sharing the Shopping List with them will help ensure you’re all on the same page. Plus, you can see who has added what item to their cart in the store once they’ve been checked off from the list. So, here’s how you can share your Shopping Lists on your iPhone.
Step 1: Open the Reminders app and tap on the relevant Shopping List.
Step 2: From the menu options, tap on the Share icon.
Step 3: Here, select the relevant app you wish to use to share your Shopping List.
This will help other users access the Shopping List. For more details, you can check our explainer on collaborating with others using the Reminders app on your iPhone.
If you’ve created a temporary list for a trip or want to remove the ones that are no longer required, you can delete the relevant Shopping List from the Reminders app. Here’s how.
Step 1: Open the Reminders app on your iPhone.
Step 2: Here, tap on the Shopping List you wish to delete.
Step 3: In the top right corner, tap on the three-dot icon.
Step 4: Here, tap on Delete List.
Step 5: Tap on Delete.
This will delete the selected Shopping List and all its contents from the Reminders app. It will no longer be accessible to you or anyone you’ve shared the list with.
Note: If you can’t access the shopping list, here’s how to fix the Shopping List not working on iPhone.
1. Can you create a Shopping List on iOS 16 and below? Because the ability to assign a list as a Shopping List is limited to iOS 17 and above, you cannot access it if your device runs iOS 16 or lower.
2. Can you use Siri to create a Shopping List on your iPhone? Once you have created a Shopping List on your iPhone, you can use Siri to add items to it. You can do this even after closing the Reminders app.
A Smart Way to Shop Understanding how you can create and share a Shopping List on your iPhone can not only help you but your family or group as well to keep track of your purchases, current and future. Additionally, iOS 17 users can also take advantage of other new features, like the StandBy Mode.
Guiding Tech
https://www.guidingtech.com/create-and-share-shopping-list-on-iphone/