Sharing photos and videos on your iPhone has become easier with iCloud Shared Album. In this article, we are going to learn how to create a Shared Album and add people to the album. We will also learn how to accept a Shared Album invite and the basic workings of a Shared Album.
What Are Shared Albums on iPhone?
Shared Albums is a feature of the Photos app on your iPhone that lets you share photos and videos with a select few people that you choose. It can work both with and without iCloud. You can share the album with anybody by just adding their email address, contact number, or iMessage phone number.
What To Do Before You Begin Sharing Albums?
There are a few things that you need to do to be able to create and use the Shared Albums feature on your iPhone. Let us see what these are.
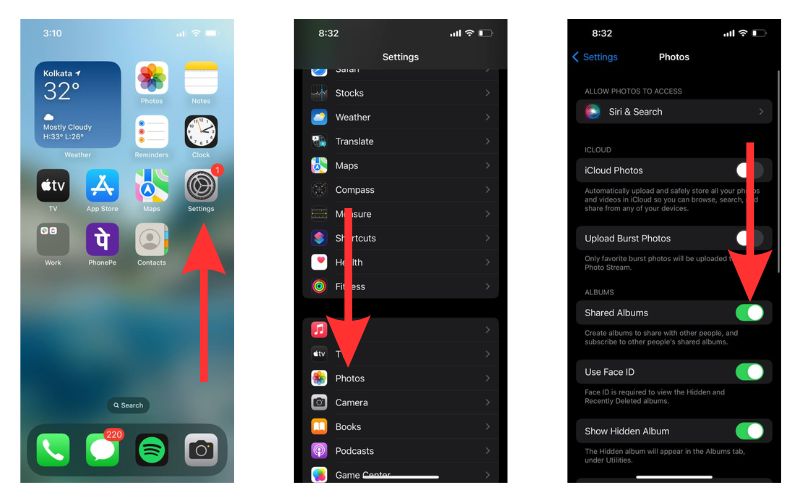
Enable Shared Albums on your iPhone: Before everything, you must enable the Shared Albums feature. Go to Settings > Photos > Turn on the toggle for Shared Albums.
Check for Software Updates: If you have any pending Software Updates, the Shared Album feature might malfunction. Check for the latest updates by going to Settings > General > Software Updates.
Set up iCloud and enable Shared Albums in iCloud: You can enable the Shared Albums feature through iCloud too. Go to Settings > Apple ID > iCloud > Scroll to Apps Using iCloud section and select Photos > Turn on the toggle for Shared Albums.
How To Share an Existing Photo Album on iPhone
Before we learn how to create a Shared Album, we will see how to share an album that already exists on your iPhone.
Time needed: 4 minutes.
Steps to share an existing album on your iPhone.
Launch the Photos app on your mobile phone.
Tap and select the album from your regular albums that you wish to share.
Now go to Select at the top right side of the screen. Then select Select All.
Tap on the Share icon at the bottom left corner of the screen.
A popup menu will appear from the bottom. Select Add to Shared Album.
Wait for the album to be processed and created.
Give an appropriate name to the album and select Next.
Now, tap on the Add People icon and add the people you wish to have access to the Shared Album.
Then select Create.
You can now add a comment if you want and select Post.
You will now find the Shared Album in your Photos app.
Add New Photos and Videos to Your Shared Album
Do you wish to add new photos or videos to your shared album? Follow the steps given below to do so.
1. Open the Photos app on your iPhone.
2. Now scroll to the Albums tab and go to the Shared Albums section. Select the album that you wish to add photos and videos to.
3. Scroll down and tap on the Plus sign.
4. Then select the photos and videos that you wish to add. Then select Add.
5. On the next screen, select Post.
You will now find that the selected photos and videos have been added to the Shared Album that you created on your iPhone.
Add New People to Your Shared Album
You can invite new people even after you have created the album. We will now show you the steps to do it.
1. Go to Photos and open the album from the Shared Albums section of your Photo Library.
2. Tap on the People icon beside the Select option at the top right.
3. Select Invite People. Then enter the name of the people that you wish to add to the album from your Contact List and select Add.
How To Create a Shared Album on iPhone
Want to share photos with friends and family? We will now look at the steps to create a Shared Album in the Photos app of your iPhone.
1. Open the Photos app and go to Albums from the menu bar at the bottom.
2. Now select the Plus sign at the top left corner of the screen.
3. Then select the New Shared Album option.
4. Type in the name of the album and select Next.
5. Then add the people that you wish to add and select Create.
Congratulations! You have successfully created a Shared Album on your iPhone.
Accept a Shared Album Invite
Suppose your friend invited you to a Shared Album. How do you accept the invitation? Let us find out.
1. Open the Photos app on your iPhone and go to the For You section from the menu bar at the bottom of the Photos home screen.
2. You will find pending invites here. Select Accept.
3. Now you will be able to view the photos and videos inside the album that your friend shared with you. This album is also going to feature in your iCloud Shared Photo Library.
Manage Shared Album
Not just sharing, but managing an album is also equally important. So, we will now see how to rename a shared album and access its other features.
Rename the Album
Renaming a Shared Album is an easy process. Let us have a look at the steps to do so.
1. Open Photos and go to Albums. Then scroll to the Shared Albums section.
2. Now select the album whose name you wish to change.
3. Tap on the Menu icon at the top right corner of the screen.
4. From the drop-down menu, select Rename Album.
5. Type in the desired name and then select Save.
You will see that the name of the photo album has changed.
Let Others Add Photos and Videos to the Album
You can let other people add photos and videos to the album you created. This feature is beneficial when you wish to receive photos from a group of people. Here are the steps to enable this feature.
1. Open the Photos app and go to the Shared Album that you created.
2. Select the Person icon from the top of the screen.
3. Now turn on the toggle beside the Subscribers Can Post option.
Now the album becomes a collaborative album in your Shared Library.
Remove People From the Shared Album
What if you mistakenly invite someone to your album and wish to remove them? Let us see how to do so.
1. Open the Shared Albums section on your Photos app and go to the album from which you wish to remove someone.
2. Now select the People icon.
3. Tap on the contact name you wish to remove and select Remove Subscriber.
4. Confirm by selecting Remove again.
Delete the Album
To delete a Shared Album, follow the steps given.
1. Go to the album from your Photos app and select the People icon.
2. Select Delete Shared Album.
3. Confirm by selecting Delete again.
Doing this removes the album from all the devices of your friends and family with whom you had shared it.
Can’t Create a Shared Album on iPhone? Here’s How To Fix
If you see that Shared Albums are not showing up on your iPhone, do not worry. Here are some easy fixes to help you solve the issue.
Go to Apple System Status and check whether the service is down.
Check to see if the shareable link from iCloud has expired. Usually, iCloud links expire after 30 days.
Check your connection status and reset your Network Settings. Go to Settings > General > Transfer or Reset iPhone > Reset > Reset Network Settings.
Turn Shared Albums off and on again.
Update iOS if there are any pending updates.
If the Low Power Mode is turned on, turning it off can solve your issue.
Advantages of the Shared Albums Feature
Now that we know all about using the Shared Albums feature, let us look at some of its notable benefits and advantages.
Share photos and videos easily with your friends and family without having to wait for file transfer.
Easy access to Shared Albums make it easy for everyone to share all the necessary photos and videos in one place making it easy for everybody to access them.
Even non-Apple users can join using the public link.
Can streamline work by allowing everybody on the team to access all the images and videos and share relevant images and videos seamlessly.
Create a Shared Album and Enjoy the Benefits
Open the Photos app and try out this feature now. From now on, every time you go on a trip or do a presentation for work, you can create a Shared Album and ensure that all the necessary images and videos can be found in one place.
If you have any more queries regarding the Shared Album feature, let us know in the comments. Subscribe to our newsletter to make sure that you do not miss any news and updates related to Apple and its products.
Tags: iCloud, iOS, Mac, photos, sharing, tips
The Mac Observer