With AirPods being incredibly popular, some may feel that their personal set is dying too fast. Considering that AirPods use lithium-ion batteries, there may be some reasons for this. Additionally, people will universally want to get the most out of their product, so I’m going to take a look at a few reasons why their AirPods may be dying too fast, while also covering some other information concerning battery life and protection.
If you feel that your AirPods are dying too fast, there might be a reasonable explanation. If you’re using a newer-generation of AirPods, there’s a couple of things you may want to consider. On the flip-side, if you’re using an older-generation of AirPods, there’s even more things you should consider. For a lot of people, their devices are an investment; one they’re looking into protecting. Keep reading to find out more.
How Long Should AirPods Last?
Depending on your AirPods, the batteries within the earphones may last for a specific amount of time. Typically, newer-generation models can expect 24-30 with a solid charge. However, don’t forget that AirPod batteries use lithium-ion, which I will go into more detail below. You can consult this handy chart to see the typical battery life of AirPods.
Charging timeAirPods 2nd generationAirPods 3rd generationAirPods Pro First-GenerationAirPods Pro Second-Generation A Single ChargeUp to five hours of listening time and three hours of talk time.Up to six hours of listening time (up to five hours with Spatial Audio) and four hours of talk time.Four and half hours of listening time and up to three and a half hours of talk time.Six hours of listening time (up to five and half hours with Spacial Audio and Head Tracking enabled) and four and a half hours of talk time.Five minutes of charging in-CaseN/AOne hour of listening time and One hour of talk time.About an hour of listening time and about one hour of talk time.One hour of listening time and One hour of talk time.With Multiple Charges of Case24 hours of listening time and 18 hours of talk time.30 hours of listening time and 20 hours of talk time. 24 hours of listening time and 18 hours of talk time.30 hours of listening time and up to 24 hours of talk timeA 15 minute charge time in-CaseThree hours of listening time and Two hours of talk time.N/AN/A N/ANote that this information is taken directly from Apple.
Why do My AirPods Only Last for One Hour?
Perhaps the simplest reason that your AirPods only last about an hour is due to the case itself not seeing a charge in quite sometime. When you leave your Charging Case disconnected for an extended period of time, it will continue to charge the earbuds regardless. This means that your Case is continuously losing power alongside your earphones.
Also, remember that you want to keep your AirPods and Charging Case at an appropriate temperature. Having them overheat will damage the battery.
Essentially, the Charging Case may just be losing power. This isn’t typically a problem if you don’t charge the case for a couple of days, but any longer than that and you may see issues. However, if this is not the issue, I’m going to explore some other options as well.
Lower the Volume
One reason your AirPods may be losing power faster than normal is due to an increase in volume. Since a transistor is necessary for each Spatial Audio amplifier, these transistors need power, which is drawn from the battery of the AirPod.
If you find that your AirPods may not be lasting as long as you would like, try turning down the volume. This can also help protect your hearing if you are listening to them too loud. Take it from a guy who plays in bands: you want to protect your hearing at all costs.
Checking the Battery if Dying too Fast
Another thing to keep in mind is the charging power of your AirPods. The battery within each individual piece is rather small, meaning you’re not going to get the same amount of juice from them like your other devices.
It also doesn’t help that cycling through the power supply of a Lithium-Ion battery can be detrimental to the health of said battery. Fully-charging your device to 100 percent and then lowering it to zero percent continuously can be detrimental to a battery. I talk about this a bit more in-depth concerning the battery of an iPhone, and the same thing applies to your AirPods.
The lithium-ion batteries inside AirPods are only good for about 350-500 charge cycles. If you’re doing deep charge cycles (going under 10 percent), this will only decrease the number of cycles. Keeping this in mind, if your AirPods are a bit older, it sadly may be time to replace them.
If you want to take extreme care of your AirPods’ battery, you should begin charging them when the life of them hits around twenty or thirty percent, and stop charging them before the battery hits 100 percent. Since the batteries usually take around twenty minutes to fully charge, taking them out before then can be a good idea to save battery health if you have older AirPods. Keep in mind that newer models of AirPods have Optimized Battery Charging, which I’ll explain later in this article when I get to the Charging Case itself.
How to Check Battery Percentage
If you need to check the exact battery percentage of your AirPods, you can do so from your iPad, iPhone or iPod touch by following these steps.
Bluetooth, and ensure that your Bluetooth is on.
Ensure that your AirPods are in their Charging Case, and keep the lid open.
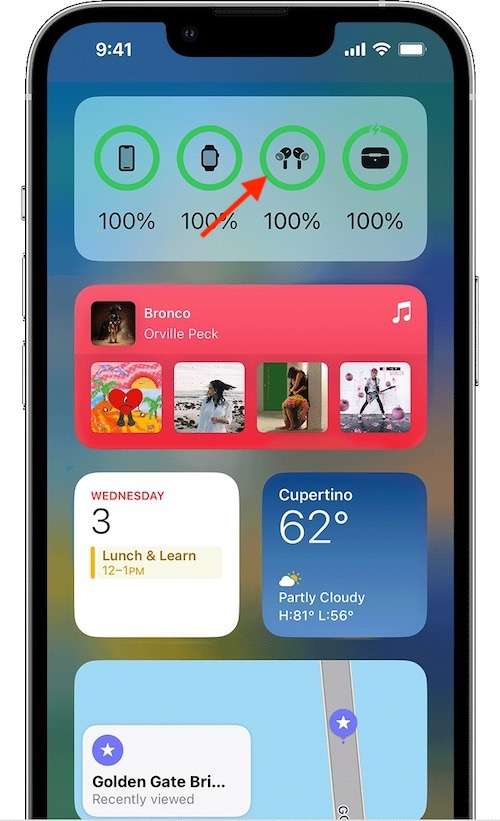
Bring the case close to your device. After a few moments, you will see the battery level. You can also use the Battery Widget. Note, however, that the widget will only display information when at least one earphone is nestled in the charging station.
Checking the battery level of your AirPods on your iPhone is rather easy. (Photo Credit: Apple.)
Check the Charging Case of Your AirPods if They are Dying Fast
If you’re having issues with your AirPods losing battery fast, the issue may be with the Charging Case itself. It’s not only important to take care of your earphones, but it’s important to take care of the case as well.
With this in mind, try to only use official charging cables and products that are approved by Apple. Additionally, try to avoid constantly opening and closing the Charging Case, as this can reduce the charge of your battery. You may also want to consider cleaning the charging ports of your case with a tiny amount of isopropyl alcohol and a Q-Tip. Do not use too much isopropyl. A little dab will do.
Some isopropyl alcohol and a cotton-swab can really help the charging ports in your AirPods Charging Case.
You should also remember to keep your newer-generation earbuds in the Charging Case when they’re not in use. Your earbuds should not overcharge while in the case, and as stated earlier, newer models of AirPods also have Optimized Battery Charging, which can help the device learn your charging schedule. Learning this information, the device will prevent the batteries from charging all the way to 100 percent until it is sure you are ready to use them.
Turn off the Noise Cancellation Feature
Some AirPods also have a noise cancellation feature built directly into the device. This helps your AirPods reduce background noise. This can be extremely helpful for eliminating the world around you, but it also helps drain the battery faster. Try disabling this feature to see how your battery handles afterwards.
Go to your iPhone Control Center.
Tap and hold the Volume Meter.
Select Noise Control from the bottom left corner.
Set the control to Off.
Disable Automatic Ear Detection
Another thing you may want to try is disabling Automatic Ear Detection. This is a default setting on your AirPods that is able to detect when the earbuds are in your ear, which then sends audio to the device. With this feature, audio will automatically pause when you remove one earphone, and stop altogether when you remove both. They then send audio again when they are back in your ear. While this can be helpful, it also drains your battery faster.
To disable this feature, go to Settings on your iPhone or iPad.
Tap AirPods near the top of your screen.
Set Automatic Ear Detection to off.
Additional Ideas
If you’re looking for additional methods to try and make your AirPods last longer, I’ve already discussed how using Apple-certified cables is the proper way to go. Additionally, don’t forget that you may want to clean your charging ports on the Case with a little (and I mean a little) bit of isopropyl alcohol.
Reset Your AirPods if Dying too Fast
You can also try resetting your AirPods. To reset AirPods, follow these steps:
Time needed: 2 minutes.
How to reset your AirPods.
Place your AirPods in the Charging Case.
From your iPhone, go to Settings and select Bluetooth.
Tap the information icon (the lower-case ‘i’) on the right.
Choose Forget This Device, and then confirm you want to unpair them.
Pair your AirPods again. Simply open the case while the AirPods are still inside the Charging Case, and hold it next to your device. Then follow the onscreen instructions.
If you need to disconnect your AirPods from your Mac, go to the Bluetooth icon in your Menu Bar and find your AirPods. Hover over the text, and then select Remove. Bluetooth in the Menu Bar, and then press and hold the Setup button on your Charging Case.
AirPods Dying Fast? Get the Most from Your AirPods
Whenever you purchase a device, you want the most you can get out of it. Doesn’t matter if it’s your iPhone, your Mac or your AirPods. However, lithium-ion will eventually deteriorate, no matter how well you take care of your devices. As mentioned earlier, if you are using an older model of AirPods, it may just be time to replace them.
However, that doesn’t mean taking proper care of your AirPods won’t help with the overall health of the batteries within each component. While you shouldn’t expect anything with a lithium-ion battery to last literally forever, there are ways to protect that battery to get the most out of it. If you feel that your AirPods are dying too fast, there are some steps you can take to correct this.
Tags: AirPods, Apple, featured
The Mac Observer