In today’s time of digital threats, security for our electronic devices is more important than ever. That’s why Apple began supporting physical security keys with iOS and iPadOS 16.3 and macOS Ventura 13.2. Let’s walk through how you can set up security keys for Apple ID on your iPhone.
What a Security Key Does
A physical security key is a small device that looks like a thumb drive or tag. It acts as a separate layer of protection for your Apple ID. The traditional form of Two-Factor Authentication (2FA) when you log into your Apple ID sends a prompt to one of your trusted devices to approve the login. Then, you enter a six-digit code, generated on the trusted device, to confirm your login on the new device.
The physical security key changes that. Instead, you use your key, plugged into your device or connected via NFC, as your 2FA confirmation. According to Apple:
Security Keys for Apple ID is an optional advanced security feature designed for people who want extra protection from targeted attacks, such as phishing or social engineering scams.
What You’ll Need to Implement Security Keys for Your Apple ID
If you want to take advantage of the advanced protection offered by Security Keys for Apple ID, there are a few things you need first.
You need iOS 16.3, iPadOS 16.3 or macOS Ventura 13.2 or later on all the devices where you signed in with your Apple ID.
You will need at least two FIDO Certified security keys that work with your devices.
Two-factor authentication must be set up for your Apple ID.
You’ll need a modern web browser. If you can’t use your security key to sign in on the web, update your browser to the latest version or try another browser. The version of Safari included with iOS 16.3, iPadOS 16.3 and macOS Ventura 13.2 should work fine.
Apple does offer a brief list of a few compatible devices. You can find a comprehensive list at the FIDO Certified Showcase.
Which one might be best for you is a subject for another day. However, I will say that the folks at Yubico were kind enough to send me a pair of Yubikey 5C NFC keys for the purposes of walking through the setup, and that model meets or exceeds just about any security requirement I could ask for.
Sidebar For a Security Recommendation
I will recommend that whatever security keys you choose allow you to configure a PIN to use them. The aforementioned Yubikey 5C NFC security keys allow this.
This extra measure is important if, by some chance, you find both your iPhone and your security key stolen. It will also alleviate the worry of “drive-by activations” if your key supports NFC.
After you set up your security keys, you need an iPhone or iPad with a software version that supports security keys to sign in to Apple Watch, Apple TV, or HomePod.
How To Set Up Your Security Keys for Apple ID on iPhone
Once you have everything you need, you can set up your security keys. Let’s get to it.
Time needed: 5 minutes.
Follow these steps to set up your security keys.
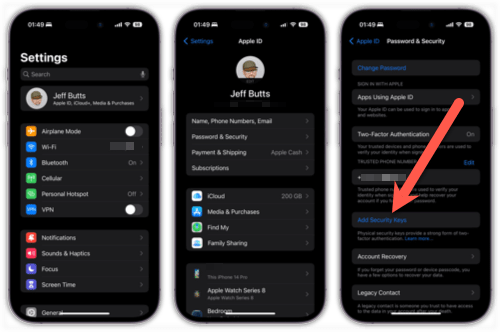
Go to Password & Security.
Tap Add Security Keys.
The following screens will reiterate what you need to do. Tap Continue, reading the information provided, then enter your iPhone passcode.
Next, your iPhone will prompt you to insert and activate your first security key. If it has a Lightning connector, insert it into your iPhone. If it’s an NFC key, just place it near the top of your iPhone.
Follow any on-screen instructions, such as entering your security key’s PIN if you have one.
Your first key will show added. Next, your iPhone will step you through adding your second, backup key.
After everything is complete, tap Done to finish setup.
You’ll now see your two keys in Security Keys. From this screen, you can add additional security keys, edit or remove an existing one, or delete all the keys.
Note that if you remove your security keys, your Apple ID will revert to using the six-digit 2FA verification codes.
Similar Steps for Your iPad and Mac
On your iPad, the steps to set up Security Keys for Apple ID will be exactly the same, just on a larger screen.
The Security Keys option on macOS Ventura is named similarly, but is in the System Settings app.
For macOS Ventura, you’ll find the setup dialog at Password & Security. Once you locate the settings, the process follows the same path as on iOS and iPadOS.
What You Should Do With Your Security Keys
It’s a good idea to store your security keys in separate locations. I have one on my keychain, while the other stays in my fireproof safe in case I need it.
Authenticating Your Apple ID With Your Security Keys
From this point forward, any time you log into your Apple ID on a new device, you’ll need one of your security keys. This includes any new iPhones, iPads or Macs you may log into.
If you get a new HomePod, Apple Watch or Apple TV, you’ll also need your security key. The only difference here is you’ll insert the key into your compatible iPhone or iPad to complete the authentication.
There are some Apple services that won’t work with Security Keys for Apple ID. For example, you can’t sign into iCloud for Windows. You also can’t sign into older devices that cannot be upgraded to a software version that supports security keys.
Furthermore, the following devices and types of Apple IDs aren’t supported:
Child accounts.
Managed Apple IDs.
Apple Watches paired with a family member’s iPhone. If you want to use security keys with such wearables, you’ll need to set them up with your own iPhone first.
A Final Word of Caution
Be very diligent in safeguarding your security keys. Yes, you have a backup key in case one gets lost. However, losing both of these physical keys, as unlikely as that may sound, will cause you quite a bit of inconvenience.
Tags: 2FA, featured, iPad, iPhone, Mac
The Mac Observer