Are you trying to update iOS 17 but can’t do so because it is stuck on the “Update Requested…” screen? You’re not alone. It is a common issue that users encounter frequently. Hence, we’ve put together this guide that will help you fix this issue.
How To Fix iOS 17 Stuck on Update Requested
1. Force Quit Settings and Restart iPhone To Fix iOS 17 Stuck on Update Requested
If the Software Update screen on your iPhone displays “Update Requested…” when trying to update to iOS 17, it can be due to temporary bugs or glitches. These bugs might prevent the iPhone from contacting the server or delay the process. The best solution to get rid of these bugs and move past the “Update Requested…” screen is to force quit the settings app and restart the iPhone.
Time needed: 3 minutes
Here’s how to force quit Settings, restart your iPhone, and update iOS:
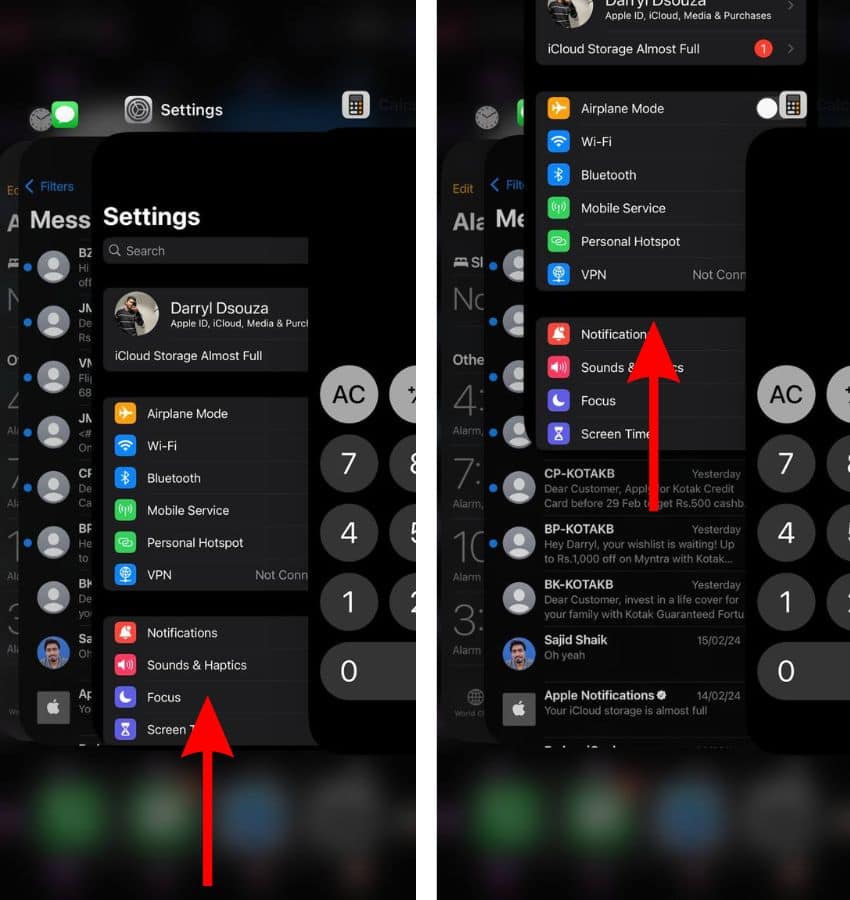
Open Settings on your iPhone and swipe up from the bottom or press the Home button to head to the Home Screen.
Now, swipe up and hold from the bottom or double press the Home button to view the Recent Apps list.
Swipe up on the Settings app to remove it from the Recent Apps list.
Restart your iPhone. If you’re unaware of the steps, you can ask Siri to restart your iPhone.
After your iPhone restarts, go to Settings > General > Software Update.
If these steps have helped you move past the “Update Requested…” screen, you can then tap the Update Now or Install Now button to update iOS 17 to the latest version.
2. Check the Internet Connection
An unstable or slow internet connection can be another reason iOS 17 is stuck on the Update Requested… screen. Please ensure that you have an active and stable internet connection. You can check your internet speed on any internet speed test website.
Moreover, Low Data Mode can also prevent your iPhone from moving past the Update Requested screen. Disabling Low Data Mode might help fix iOS 17 stuck on Update Requested.
Open Settings on your iPhone and head to the Wi-Fi option.
Tap on the Wi-Fi network to which your iPhone is connected. Or, tap the “i” button located to the right of the Wi-Fi network.
On the next screen, disable the Low Data Mode toggle.
If you’re using Mobile Data, head to Settings and tap the Mobile/Cellular Data option.
On the next screen, select the “Mobile/Cellular Data Options” option.
Then tap the Data Mode option and select Standard, Allow More Data on 5G, or any other option apart from Low Data Mode.
3. Disable VPN To Fix iOS 17 Stuck on Update Requested
An active VPN connection might be the reason your iPhone is stuck on the “Update Requested” screen. Therefore, disabling the VPN can help you move past the this stage.
Open Settings on your iPhone and head to the General option.
Scroll down and select the VPN & Device Management option.
Tap the VPN option on the next screen.
Disable the Status toggle to disconnect from the VPN service.
Alternatively, if you see a VPN toggle on the Settings screen, you can toggle it off to disconnect from the VPN service.
4. Delete the iOS Update File
Your iPhone might be stuck on the Update Requested screen because the iOS 17 file it is trying to download is corrupted. Therefore, you must delete this corrupted file to fix iOS 17 stuck on Preparing Update.
Open Settings on your iPhone and head to the General option.
Tap the iPhone Storage option.
On the iPhone screen, scroll down and tap the Software Update option.
Next, tap the Delete Update button.
Tap the Delete Update button in the pop-up to confirm your selection.
Head back to General settings and select the Software Update option.
Tap the Update Now or Install Now button and enter the iPhone’s passcode.
5. Clear Storage Space To Fix iOS 17 Stuck on Update Requested
Low storage space can be another reason the iPhone can’t move past the Update Requested screen. Minor iOS updates are relatively small compared to others. However, major iOS updates have large file sizes.
Therefore, please ensure that your iPhone has at least 1 to 1.5x times the file size as free storage space to download and install the software.
Open Settings on your iPhone and head to the General option.
Tap the iPhone Storage option.
The next screen will display the amount of occupied and total storage space on your iPhone. You can delete apps that you don’t use often to free up storage space on your iPhone.
Tap on any app you want to delete.
Next, tap the Delete App button, and then tap the Delete App pop-up to confirm your selection.
The iPhone might also display a “Recommendations” option. Click on it and iOS will recommend actions to free up storage space on your iPhone.
An alternative for the steps mentioned above, and even quicker in my experience, would be a handy maintenance tool. For example, when I want to clear storage space on my iPhone or Mac, I use Intego Washing Machine.
It has a specific iOS/macOS cleaning engine that declutters all build-ups, such as unnecessary files and caches, optimizing your device within minutes.
➡️ Get Intego Washing Machine
6. Reset Network Settings To Fix iOS 17 Stuck on Update Requested
Misconfigured network settings or temporary bugs and glitches within network settings can be the reason the iOS 17 update is stuck on the “Update Requested” screen. We suggest resetting network settings as it might help fix the issue.
Open Settings on your iPhone and head to the General option.
Here, scroll down and select the Transfer or Reset iPhone option.
On the next page, tap the Reset option.
Then select the Reset Network Settings option.
Enter the device passcode to confirm your selection.
Tap the Reset Network Settings option in the pop-up to confirm your selection.
7. Update iPhone Using Mac
Even if the iOS 17 update is stuck on the Update Requested screen, you can still update your iPhone using a Mac. Here’s how:
Connect your iPhone to your Mac using a Lightning or Type C cable. Please ensure that the cable is MFi certified. You can use the charging cable that comes bundled with your iPhone.
Click Allow on your Mac.
Open the Finder and click the iPhone option under the Locations menu in the sidebar.
Click the Trust button under the Trust “iPhone”? Screen.
Now, unlock your iPhone and tap the Trust button on the “Trust This Computer?” pop-up.
Enter your iPhone’s passcode to confirm your selection.
The Finder will have access to your iPhone and display the information.
Click the Check For Update button under the Software menu in the Finder.
Click the Download and Update option. Follow the on-screen instructions to update your iPhone using your Mac.
If you do not have a Mac or have an older Mac with iTunes, you can update your iPhone through iTunes.
In case none of the aforementioned steps help you, we suggest contacting Apple Support. That said, if you have any doubts regarding this guide, please let us know in the comments below.
The Mac Observer