Few things are as frustrating as when the dependable iPhone OTP AutoFill feature, designed to simplify our lives, suddenly decides to misbehave. My iPhone expects me to commit an OTP to memory and manually input it? Nuh-uh, I will not endure the daily hassle of repeatedly entering OTPs, and neither should you. Follow along as I guide you through the common reasons your iPhone AutoFill password feature may stop working and offer practical solutions.
Why Is AutoFill OTP Not Working On My iPhone?
Your iPhone’s OTP AutoFill feature might not work due to several factors including settings configuration, app compatibility, OTP field format mismatches, a weak cellular signal, and an outdated operating system.
How To Fix OTP AutoFill on iPhone
Before we dive into the nitty-gritty, it’s essential to start with a few preliminary actions to ensure a smooth journey toward fixing OTP AutoFill issues on your iPhone. Here are some of them:
Force Restarting Your iPhone: A force reset can be useful when your iPhone malfunctions. Hold the power and volume down button until you see the Apple logo, then let go. Your iPhone should restart, which might resolve some of the software-related issues.
Check Your Internet Connection: Make sure your iPhone has a stable internet connection. A poor or unstable connection can interfere with OTP delivery and AutoFill.
1. Activate iPhone OTP AutoFill
Time needed: 1 minute
To enjoy any success with iPhone OTP AutoFill, first, you need to make sure that the AutoFill Password feature is activated as shown below:
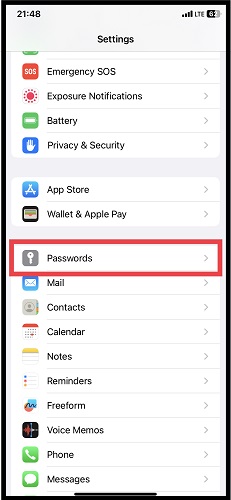
Go to the Settings app.
Tap Passwords.
Tap Password Options.
Lastly, toggle on AutoFill Password.
2. Check Your Choice of Keyboard
For OTP entry, selecting the appropriate keyboard might be quite important. To make sure you’re using the best keyboard for OTP AutoFill, follow these instructions.
Use the Standard iOS Keyboard: Use the default iOS keyboard when inputting OTPs for the best compatibility and dependability. Make sure it has been enabled by choosing “English” or another language from the list of keyboards under Settings > General > Keyboard.
Turn off Third-party keyboards: Third-party keyboards might not support OTP AutoFill as well as the built-in keyboard, so you might want to temporarily disable them if you have any installed.
3. Understand and Configure Focus Modes
If you have Focus mode turned on, then you may not receive SMS passcodes and other notifications from your message app, and if you don’t receive notifications, iOS may be unable to read their OTPs. To turn off Focus Mode, follow these steps:
Go to Settings > Focus.
After you’ve done that, all you need to do is tap the focus that is on (Messages in this case) to turn it off. Now your iPhone will be able to receive notifications, including OTPs.
4. Customize Transaction-Specific OTP Notifications
You can tailor the notifications you receive for OTPs generated by specific transactions. You can, for example, disable the notifications or have them displayed as banners rather than alerts. Follow these steps to configure transaction-specific OTP notifications:
Tap Settings app.
Select Notifications.
Select Transactions.
Change the notifications as you see fit.
5. Adjust Message Notifications for Optimal OTP Detection
You can adjust the message notifications for optimal OTP detection. For example, you can choose to have the notifications delivered silently or to have them displayed as banners instead of alerts. To adjust message notifications for optimal OTP detection, follow these steps:
Tap Settings.
Tap Notifications.
Tap Messages.
Make the desired changes to the notifications.
iPhone OTP AutoFill Not Working After Update
If your iPhone OTP AutoFill feature is not working following a recent update, it can be frustrating. To resolve this issue:
Check Settings: Verify that OTP AutoFill is enabled in your settings. Go to Settings > Password > AutoFill Passwords and ensure it’s turned on.
Restart Your iPhone: Sometimes, a simple restart can solve the problem. Press and hold the Power button, then slide to power off. Wait a moment and turn it back on.
Update Your iOS Installation: Ensure you’re running the latest iOS version. Go to Settings > General > Software Update and install any available updates.
Reset Settings: If the issue persists, try resetting your settings. Go to Settings > General > Reset > Reset All Settings. Note that this won’t delete your data but will reset settings to default.
By following these steps, you should be well on your way to resolving AutoFill password issues on your iPhone. If problems persist, don’t hesitate to reach out to Apple Support for further assistance.
Factory Reset
When all else fails in resolving persistent issues with your iPhone, a factory reset can be the ultimate solution. However, it’s crucial to approach this step with caution, as it will erase all your data, including apps, photos, and settings. Therefore, it’s of utmost importance to prioritize data backup before proceeding.
Once your data is securely backed up, you can proceed with the factory reset. Here’s how:
To do a factory reset, open Settings on your iPhone.
Go down the page and tap General.
Tap Reset.
Select Erase All Content and Settings.
After the factory reset, your iPhone will be virtually in a brand-new state. You will have the chance to restore your data from the backup you made during this procedure. By doing this, you can start over with a clean slate and restore access to your applications, images, and settings.
For further reading, refer to our guide on how to safely carry out a factory reset on your iPhone.
Conclusion
From checking your settings to ensuring app compatibility, you’ve learned how to address various challenges that might disrupt OTP AutoFill. By paying attention to OTP field formatting and considering signal strength, you’re equipped with the tools to ensure a seamless OTP AutoFill experience. Don’t forget that keeping iOS updated is crucial for optimal performance, and a force restart can be your troubleshooting ace.
Please share your thoughts, personal experiences, and questions relating to iPhone OTP autofill in the comments section below. You may also share this content with someone you know if you found it helpful and think they would benefit from it.
The Mac Observer


